
The Ultimate Pentesting Experience: Simple. Limitless. FREE.
Setting up your own home lab for unparalleled freedom and flexibility.
HACKS
Ryan Pearson, CNVP
2/8/20259 min read
Why Virtual Environments Matter
As someone who's been in the field of cybersecurity for a while, I've seen firsthand how important it is to have a reliable and isolated testing ground. Whether you're a beginner or an experienced hacker, having a virtual environment allows you to experiment with different tools and techniques without compromising your actual, "production" machine.
Step-by-Step Guide: Setting Up Your Virtual Environment
Choosing the Right Attack Box
Tools You’ll Need:
When it comes to choosing an attack box, there are several options available. Some popular choices include Kali Linux, ParrotOS, BlackArch, and more. I plan to demo ParrotOS and BlackArch at some point in the future. However, for this tutorial, we'll be using Kali Linux as our preferred choice.
Here's why:
Kali Linux is one of the most widely used penetration testing distributions.
Its user-friendly interface makes it accessible to beginners and experts alike.
Merely because it's what I know, it's what I've been using for years, and it's I feel comfortable teaching on.
(Plus... the kali-undercover mode is really frickin' cool!)
If you'd prefer to watch than read, check out my video at the bottom of this page!
🍺 I am currently enjoying:
My own -- Kia Ora! NEIPA

Introduction
As an ethical hacker, having a secure and isolated environment is crucial for testing and experimenting with different tools and techniques. In this tutorial, we'll walk you through setting up your virtual environment using Oracle VirtualBox as our Virtual Machine Manager (VMM), Kali Linux as our attack box, and a vulnerable VM from Vulnhub.com.
Install Oracle VirtualBox:
You could also go with one of many great choices of a Virtual Machine Manager (AKA a Type 2 Hypervisor). I'm merely going with VirtualBox from Oracle because it's what I know, it's what I've been using for years, and it's I feel comfortable teaching on.
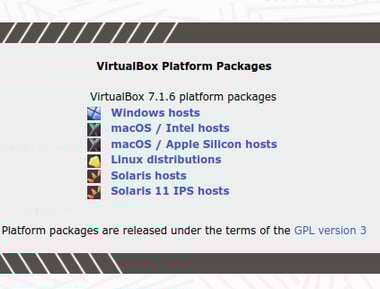
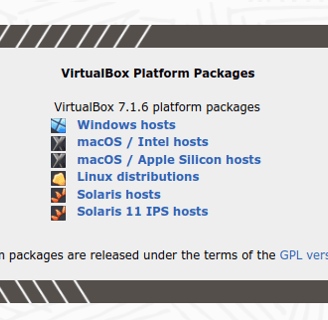
To install, we can navigate to Download VirtualBox. There, we'll see several package options. Please choose accordingly for your host OS. Windows will download an '.exe' installer MacOS offers App Images for both Intel and Apple Silicon processors. For my fellow Linux Geeks, I recommend using your appropriate package manager. However, there are selections for various distros using the link here as well.
So, select your appropriate installer and follow those instructions accordingly.
Install Attack Machine:
Again, the world is your oyster here. If you're following along with me, I'll be using the VirtualBox image from the Download Kali Linux Page. I like this option because it's fast and easy, and completely suits my needs -- I am only using the attack machine as a tool box, as it were. When I try out ParrotOS, I will absolutely do the same thing ever.
Walking through a Linux installation is a good experience to be familiar with, however. So if you have never done so before, I recommend visiting my friend Debon's video for this part. He keeps the process very succinct, covers all the steps clearly, and it keeps everything super simple. So you can walk through that with him here. Once you're you're done with that, come back and we'll set up the the Host-Only Adapter.
If you're following along with me, download the VirtualBox image from the Download Kali Linux Page. Once it's downloaded and the hashes are checked for integrity, extract it to the location you would like to pull it into VirtualBox from. If for any reason you're having trouble extracting the compressed files, try these solutions accordingly:
Windows -- Install 7zip; it's a FOSS program and the 'exe' installer should be a quick and simple setup.
MacOS -- Install Keka; it's a free program, capable of the stronger encryption algorithms.
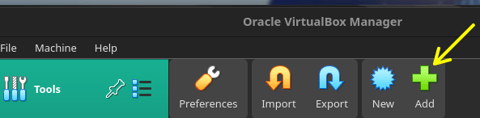
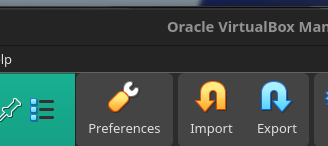
Once the files are extracted, select the "Add" button on Oracle VirtualBox Manager. Simply select the 'vbox' image which was extracted. And, boom! You're already done.
Set Up Attack Machine:
Regardless of the selection, you will likely need to update package manager mirrors and upgrade package versions. Interestingly enough, if you went with either ParrotOS or Kali Linux as your attack machine, they both branch off from a Debian Linux root. Therefore, they both use the 'apt' package manager, and these instructions/commands are the same for both!
passwd
Once your VM is booted up, login with the identified credentials. Using the same image I used, the default login for kali.vbox is --
Username: kali
Password: kali
Similarly, the default login for parrot.vbox is --
Username: parrot
Password: parrot
Once logged in, best practice is to change the password. Open the terminal from the taskbar at the top. The command to change your password in just about every distro imaginable is:
passwd
The prompt will ask you to confirm the current password (so, 'kali' or 'parrot' accordingly), then ask to enter a new password twice. Reboot is not required after doing so... but I do. So if you do like me, please enter your new credentials once it boots back up.
caffeine
Let's but those new credentials to work! Open the terminal back up, and enter the following command to sync your mirrors and update information available to your package manager:
sudo apt update
It will ask you for the new password you just set in the last step, which only you should know! You'll most likely see a total of packages needing updates around one thousand'ish. Well... that's gonna take a while! Personally, I want the freedom to walk away if I need to. So, I'll change the settings on my host machine to keep it from going to sleep (and lock). Then, back in the VM terminal, I'll install a nice package called "caffeine":
sudo apt install caffeine
You shouldn't need your password this time, your credentials should still be elevated from the update. Once complete, no reboot required. Open the Kali Dragon logo in the top left of the screen to open all apps, and search "caffeine". Select the "Caffeine Indicator", placing a coffee/tea cup in the right-hand side of the top taskbar. Open that for options, select "Activate". If successful, you'll see steam rising from your fresh cup of coffee/tea. Brilliant! Now you can walk away and the VM won't fall asleep to interrupt the package upgrades. (It will lock the screen at some point for a particular package; I'm not sure which, but just be mindful you'll need to log back in at some point, even with this enabled.)
upgrade -y
Fantastic! We're ready to actually get this tool box operational. It can be tedious to sit there and supervise 1K+ packages upgrading. I recommend using this command:
sudo apt upgrade -y
Depending on the time between the previous command and this one, you may need to enter your password again. But I'll let you know what we're doing with this command --
sudo = "super user do", elevates your privileges
apt = envokes the package manager options
upgrade = you can denote which specific packages you want to upgrade; but by not specifying a package, we're telling apt to upgrade all packages with upgrades available
-y = the tedious part about upgrading 1K+ packages is the system constantly asking us, "are you sure you want to install this?" The '-y' flag sets this up to just always answer "YES!"
This part is going to take a while. But you set yourself up for success! So step away for refills as necessary and do something else while it's running. I usually try not to do anything on the host machine, as to not use any resources or bandwidth which could help this process go faster. But by all means, choose your own adventure!
Virtualization Troubleshooting:
If you go to boot up the attack machine, and you see the Kali grub menu and loading dragon (or equivalent to your attack machine selection), you are clear to go to the next section... no need to waste your time on this.
However, if the VM crashed as soon as you tried to pull it up and you saw an error on the right-hand side of the Oracle VirtualBox Manager window, then this means you do not have virtualization enabled on your host OS and you should try these next steps.
Host OS = MacOS
For our Apple Garden friends, you will want to try installing VMware via Homebrew Package Manager. (And SHOOT! It did not even occur to me to bring up the coincidence of naming conventions in my video... but there you have it, folks!) Unfortunately, I do not have instructions for using VMware if you would rather use that when needing to install it anyway. On the surface, it seems very similar to VirtualBox, but I do not have any experience with it. However, do not feel obligated to use VMware with the necessity to installing it. Just the installation itself should be enough to kick virtualization into 'enabled' mode for VirtualBox to use as well.
If you used other methods instead, I'd love to get your feedback to improve this post.
Host OS = Linux ~or~ Windows
For most of the rest of us, we'll need to enable virtualization in the BIOS (or UEFI) settings. To do so, we'll need to shut down the machine. As we boot it back up, we will need to press the appropriate key. Mine, and for most recent HP PCs, is F10. If you do not know yours, search for keywords like, "model bios options" (where "model" = the make and model number of your PC).
In the BIOS (UEFI) settings, we are looking for a configuration relating to "Virtualization". Ensure that it is "Enabled", then save and quit.
The host machine should boot back up, and you should be good to go for your Attack VM!
Host-Only Adapter:
And we're just going to do a complete shutdown rather than a reboot because now we need to set up a host only adapter and connect to a Host-only adapter.
Why are we setting up a Host-Only Adapter?
We're setting up a host-only adapter to keep these VMs isolated from the public-facing internet, but still have them be able to interact with each other. This is best practice because you don't want the vulnerable machine exposed to the public-facing internet. So, whenever you want to update your attack machine like we just did, make sure you change the network settings back to that NAT (Network Address Translation) adapter like it just was.
How to Enable Host-Only Adapter
On the Oracle VirtualBox Manager, select the "Tools" tab. Select the additional options icon (three stacked lines with checkboxes). Select, "Network", which is the fourth option down. we're going to be on hosts only networks and we're going to do create, OK, so now we have this V Box Zero. You can see that the network.
Sider is one nine two one six eight five six. Twenty four. Says one twenty four but obviously it's gonna start at zero if you want to see the details will go to properties.
So we can go to configure manually. That's just where it goes. We'll go to configure autonomaticaly and we'll enable the DHCP server. And that should.
Figure manually, DHCP server.
Bye. OK. All right, so you have to go manually. That's how you get rid of that error. If you're using macOS, they do not support a host only adapters. It's going to show as a host only network.
Let's say that you don't want.
This network in the 192 168 range, that's totally fine. You're on Windows, you can just go ahead and change those options. You can change it here you can go and I'll go ahead and show you because it is going to be an error. So that's here. That's your dot 12.
Okay, I'm going to click apply. It's going to show as an error for me. If you're on Windows, you can apply and you'll be good. Okay. Network interface error. Why? If you are on Linux, like me, or on Mac, you need to create a new file in your slash etsy directory. So, um, here's how we do that.
I like to use nano as a text header. We will need we will need enhanced or we will need elevated privileges. So use sudo. You can pronounce it sudo or sudo. I don't care. It's super easy to do. I don't waste energy stressing about whether things are pronounced pajamas or pajamas or I digress. Okay. Yes. So it's etsy vbox networks.com.
And then you can enter something like, so. It will start at the asterisk.
That is how you denote that the line is starting for the system.
Save. We'll get into nano text editor another time. OK, and now we should be good to try again. So let's try that again. So I'm going to create a new.
Adapter.
Not that I think anybody would reach this amount, but it is important to keep in mind that.
If you are setting up something other than the default, you're limited to 128 bucks.
Apply. All right. And now I got no error. That is how you set up a host only adapter with a network other than the default. And if you were having trouble even with the default and you're on Mac OS or Linux, it's probably because you had that slash Etsy slash VBox slash networks.com file already. And it was blank. If you just want to go with the default and you're still getting an error, double check and see if you have that file and then just remove it and then you should be able to go with the defaults.
Okay, and we're almost done.

KIA ORA!